It's a question we're asked all the time, from homeowners looking to give a tired boundary fence a facelift without the expense of replacement, through to landscape professionals working on a contemporary garden design scheme where slatted lines and privacy are the essential requirement.
The answer, of course, is yes. Slatted cladding can, indeed, be used on or as part of a fence, and when done well, the finished result can be stunning. Not least because you have the advantage of a solid base with a slatted finish, something a traditional fence panel cannot offer. In addition, the longevity of the finished result can be enhanced.
Of course, there's more to it than simply screwing boards to posts! The substrate, the fix, and — perhaps most importantly — whether you're cladding a fence or building a brand new slatted fence from scratch, there are differences. We'll take you through both, as well as the choices, costs, and other factors that determine whether your finished result looks like a professional job or a DIY disaster.
Quick Reference: Slatted Cladding on Fences
| Scenario | Best Approach |
|---|---|
| New fence — slatted look | Build a post-and-rail frame; fix slats directly to rails |
| Existing close-board fence | Fix horizontal battens to the frame; clip cladding boards to battens |
| Existing panel fence | Assess panel strength first; may need reinforcing or replacing frame |
| Garden room or outbuilding fence | Composite cladding on timber subframe fixed to posts |
| Boundary wall or screen | Freestanding post-and-rail system with slatted infill |
Two Different Projects — Know Which One You're Doing
The phrase "slatted cladding on a fence" actually covers two quite different projects, and confusing them leads to poor results.
Project A: Installing cladding boards onto an existing fence. Here, you have a fence already in place — close-board, panel, or frame — and you want to cover it with slatted composite or timber cladding boards to update its appearance. The fence itself becomes the substrate, and the cladding goes on top of or in front of it.
Project B: Building a new slatted fence using cladding-style boards. Here, you're starting from scratch. Posts go in the ground, a rail framework is built between them, and slatted boards are fixed to the rails to create the fence itself. The boards aren't cladding an existing structure — they are the structure's infill.
Both are valid and popular, but they have different structural requirements, different material needs, and different installation approaches. We'll cover both.
Material Choice: Composite vs Timber Slatted Boards
Before getting into the installation, it's worth spending a moment on materials - because the choice you make here affects everything from fixing method to long-term maintenance.
Composite Slatted Cladding
Composite boards are made from a blend of wood fibre and recycled polymer. They have become the dominant choice for contemporary slatted fence and cladding projects in the UK. The appeal is obvious: they look like timber, they come in a range of natural tones and finishes, and they require virtually no ongoing maintenance. No painting, no staining, no annual treatment.
For fence applications specifically, composite is compelling because it's exposed to everything - rain, frost, direct sun, and ground-level moisture from grass and soil. Timber needs ongoing protection to cope with all of that. Composite simply doesn't.
The key distinction within composite is between capped and uncapped boards. Capped (or co-extruded) composite has a protective polymer shell bonded over the board surface, giving superior resistance to UV fade, moisture absorption, and surface scratching. For anything going outdoors — especially low-level fence applications where moisture exposure is higher — capped composite is worth the additional cost. Browse the full composite slatted cladding range to compare profiles and finishes.

The Triton Grey Composite Slatted Panels in Use in a UK Back Garden.
Timber Slatted Boards
Timber slatted panels bring a warmth and authenticity that composite can't quite replicate, and for many garden schemes — particularly naturalistic or traditional settings — timber is genuinely the better aesthetic fit.
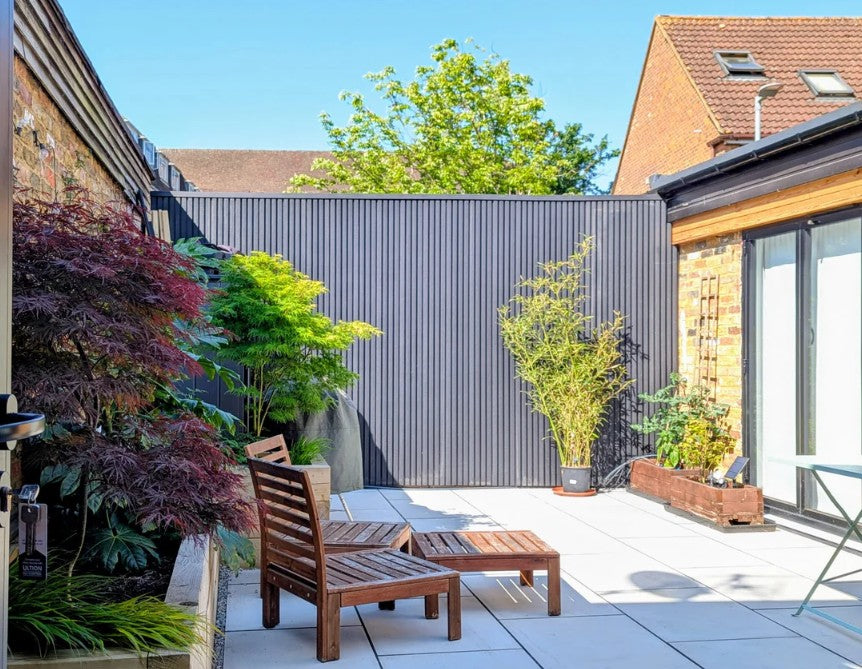
The key is species selection. Softwood will deteriorate quickly without consistent treatment. For a fence application, you want a naturally durable hardwood or a species with proven outdoor performance. Cedar and larch are the standout choices in the UK market — both are naturally oils-rich, dimensionally stable, and weather to an attractive silver-grey if left untreated, or can be oiled to retain their warm tone. The cedar and larch slatted fence panels with 6mm spacings are a well-regarded option for exactly this kind of project — the spacing is designed to give privacy whilst still allowing light and airflow through the fence.
The trade-off is maintenance. Even naturally durable timber benefits from periodic oiling or treatment, and you'll need to factor that in over the life of the fence.

Canadian Cedar Slatted Fencing on a UK Project.
Project A: Cladding an Existing Fence
Assessing Whether Your Existing Fence Can Take It
The first question before any boards or fixings are ordered is whether the existing fence is strong enough to support additional cladding.
Slatted composite boards are not heavy individually, but across a full fence run they add meaningful weight and significantly more wind load. A fence that's already leaning, has rotted posts, or uses undersized rails is not a suitable substrate for cladding. Adding weight to a weak structure doesn't fix it — it accelerates the failure.
Check the following before proceeding:
- Posts: Are they solid at ground level? Probe the base with a screwdriver — any softness or sponginess indicates rot. A rocking post is a post that needs replacing before anything else happens.
- Rails: Are the horizontal rails fixed securely to the posts? Do they flex or move when pushed? Composite boards need a rigid fixing point — rails that flex will cause clip fixings to work loose over time.
- Overall plumb and level: A fence that's significantly out of plumb will produce a cladding installation that looks wrong. Minor variation can be corrected with packing; more than 20–25mm out will need addressing at post level.
If the fence is fundamentally sound but the boards or panels are tired, close-board fences in particular make a solid base for horizontal composite cladding — the vertical pales and arris rails give you consistent fixing points across the whole face.
Building a Batten Subframe on an Existing Fence
For most existing fence types, you'll need to fix a batten framework to the fence face before cladding boards go on — much like fixing battens to a brick wall. This serves two purposes: it creates a consistently flat surface for the cladding regardless of minor variations in the fence face, and it allows a ventilation gap behind the boards. Very important.
For horizontal board installation, battens run vertically at 400–600mm centres. Fix them through the existing fence face and into the rails behind with appropriate timber screws. Check each batten with a spirit level and pack where needed.
For vertical board installation, horizontal battens fix to the fence, and you'll need a counter-batten system to maintain a drainage cavity behind the cladding. There are various guides online to help you with this if stuck.
Once the battens are in place, board installation follows the same process as any composite cladding job — starter strip at the base, hidden clips or face-fixing into the battens, expansion gaps at each board end. For a detailed walkthrough of the board-by-board installation process, our composite slatted cladding installation guide covers every stage.
Project B: Building a New Slatted Fence from Scratch
This is where the real design freedom comes in and it's how most contemporary slatted garden screens and boundary fences are built.
Step 1: Set the Posts
Everything depends on the posts. Get them right — properly spaced, correctly set in depth, and truly plumb — and the rest of the project follows naturally. Rush them and you'll be fighting the fence for every subsequent stage.
Post material: For composite board infill, use either pressure-treated timber posts (100×100mm minimum for spans up to 1.8m; 150×150mm for taller or more exposed runs) or steel box section posts. Steel posts are increasingly popular for contemporary schemes — they're dimensionally very stable, don't rot, and give a clean, minimal profile. Concrete posts are another option but tend to make fixing rails more involved.
Post spacing: Keep spans between posts to 1.8m maximum for most composite or timber slatted infill. Beyond this, boards in the centre of the span can deflect noticeably under wind load — particularly hollow composite boards. For a more rigid feel, tighter post spacings of 1.5m are worth considering on exposed sites.
Setting depth: As a rule, posts should be set to a depth of one-third of their total length — so a 2.4m post for a 1.8m high fence needs 600mm in the ground. In softer or wetter ground, go deeper. Concrete in the posts for anything that needs to be permanent and solid. Postcrete is fine for most domestic applications; wet concrete poured and tamped is better for larger-diameter posts or exposed, windy positions.
Getting posts plumb: Use a post level or a standard spirit level on two faces simultaneously. Brace each post while the concrete sets — don't assume it'll stay in position.
A post that's even 5mm out of plumb will be visibly wrong once the clean lines of slatted boards go between them!
Step 2: Fix the Rails
Rails span between the posts and give the slatted boards their fixing points. For most residential fence heights, two rails are the minimum; three rails are better for heights above 1.5m, and for any fence taking composite cladding boards, three rails are recommended to prevent mid-span flex.
Rail positioning for horizontal boards: Position rails vertically — one at the top, one at the bottom, one in the middle — and the slatted boards fix horizontally across them. Rail-to-board fixing is straightforward: clips into each board groove at every rail position.
Rail positioning for vertical boards: Rails run horizontally between posts, and the boards fix vertically down from a top rail to a bottom rail. Ensure rails are level across the full span.
Fix rails to posts using appropriate joist hangers, recessed rail brackets, or direct screw-fixing depending on post material. For timber-to-timber, structural screws or coach bolts give the strongest connection.
Step 3: Fix the Slatted Boards
With a solid post-and-rail frame in place, board installation is straightforward. Work methodically, check level regularly, and don't skip the expansion gaps.
For composite boards: Use the manufacturer's hidden clip system at each rail position. Start with a level starter strip at the base and work upward. Maintain the specified gap between board ends and posts — typically 5mm minimum, more on south-facing aspects that will see high temperature variation.
For timber slats: Pre-drill to avoid splitting, use stainless or coated screws, and consider a consistent spacer block to maintain even gaps between boards. The visual effect of slatted timber fencing depends heavily on consistent, even spacing — worth the small extra effort.
Finishing the top and ends: Cap or trim the exposed ends of hollow composite boards with end caps. For external corners where a fence returns or meets a gate post, a purpose-made angle trim — such as the Triton 3.6m composite cladding angle — gives a clean, professional finish to external corners and exposed edges that makes a real difference to the overall quality of the result.
Fence Post Fixing: Common Questions
Can I fix slatted cladding boards directly to fence posts without rails? Only if the post spacing is very tight — 400–600mm — which is uncommon in standard fencing. Most fence posts are spaced at 1.8m, and composite or timber boards at this span will flex and feel unstable without intermediate rail support. Rails are not optional on standard fence spans; they're the structural backbone of the whole installation.
What fixings should I use into timber fence posts and rails? Stainless steel screws or the cladding manufacturer's specified clip system. Never use untreated steel fixings outdoors — they will rust, and the staining on composite boards is very difficult to remove. Galvanised fixings are acceptable; stainless is better.
My fence posts are concrete — can I still fix rails to them? Yes, but it requires the right approach. Concrete post systems typically have pre-formed slots or grooves designed to accept timber gravel boards and panels — but slatted cladding needs a positive rail fixing, not just a slotted panel. Use appropriate concrete-to-timber post brackets or fix a timber batten to the concrete post face with frame fixings, then attach your rails to the timber.

Costs: What to Budget For
Costs vary significantly depending on material choice, fence height, length of run, and whether you're going DIY or using a landscaper.
| Element | Approximate Cost (UK, 2025) |
|---|---|
| Composite slatted boards (supply) | £25–£80 per m² |
| Timber slatted boards — cedar/larch (supply) | £20–£55 per m² |
| Timber fence posts (100×100mm treated, 2.4m) | £15–£30 each |
| Steel box section posts | £35–£80 each depending on size |
| Rails and fixings | £8–£18 per linear metre of fence |
| Professional installation (labour) | £150–£280 per day |
| Total installed — composite, mid-range | £90–£150 per m² |
| Total installed — timber, mid-range | £70–£120 per m² |
On a typical garden fence run of 10 linear metres at 1.8m high — roughly 18m² of infill — expect total installed costs in the region of £1,600–£2,700 for composite, and £1,260–£2,160 for quality timber. The timber figure will require periodic maintenance spend on top; composite won't.
For a complete DIY project using quality composite boards and treated timber posts, materials-only costs typically sit in the range of £900–£1,500 for a run of that size, depending on board specification.
Composite vs Timber Slatted Fencing: Which Is Right for You?
| Consideration | Composite | Timber (Cedar/Larch) |
|---|---|---|
| Upfront cost | Higher | Lower to mid |
| Maintenance | Minimal — annual clean only | Periodic oiling or treatment |
| Lifespan | 20–25+ years | 15–20+ years with treatment |
| Aesthetic | Contemporary, consistent colour | Natural warmth; weathers attractively |
| Fade resistance (capped) | Excellent | Moderate without treatment |
| Eco credentials | Uses recycled materials | Naturally renewable; lower processing |
| DIY-friendliness | Very good | Very good |
Neither is categorically better — it genuinely depends on the setting, the aesthetic brief, and how much ongoing maintenance you're prepared to do. For a low-maintenance contemporary scheme, composite is the pragmatic choice. For a more naturalistic garden where the timber's character is part of the appeal, cedar or larch is hard to argue with.
Browse the composite fence panel range or the slatted timber fencing collection to compare options side by side.
FAQs: Slatted Cladding on Fences
Can I install composite cladding boards on an existing wooden fence panel? Flat panel fences — the standard overlapping board type — are generally not strong enough to use as a direct fixing substrate for cladding. The panels themselves aren't structural. The better approach is to fix battens directly to the fence's framework (posts and rails), bypassing the panels, and clip the cladding to the battens. If the post-and-rail frame is solid, this works well.
How do I stop slatted fence cladding from warping or bowing? Warping is almost always caused by one of two things: insufficient fixing points (too few rails, or rails spaced too far apart), or missing expansion gaps at board ends. Composite boards that are fixed too tight will have nowhere to go when they expand in summer heat — bowing is the result. Follow the manufacturer's expansion gap guidance, use three rails for any fence above 1.5m, and the boards will stay flat.
What's the maximum height for a slatted cladding fence without planning permission? In most residential situations, fences up to 2 metres high don't require planning permission — but there are exceptions. A fence over 1 metre adjacent to a highway (including a footpath) will need consent. Listed buildings, conservation areas, and new-build developments with specific covenants may also have restrictions. Always check with your local planning authority if you're unsure — it's a quick conversation that can save a costly mistake.
Can slatted cladding on a fence provide good privacy? Yes — and this is one of the most popular reasons for choosing a slatted design. The key is the gap width between boards. A 0–5mm gap gives near-solid privacy whilst still looking lighter and more designed than a close-board fence. A 6–10mm gap allows more light and airflow whilst still blocking direct sightlines at normal viewing angles. The cedar and larch slatted panels with 6mm spacings are a well-tested solution for exactly this balance.
Is it worth cladding an existing fence or should I just build a new one? If the posts and framework are sound, cladding an existing fence is a cost-effective way to get a premium result without the cost of full replacement. If the posts are rotting or the frame is weak, rebuilding from scratch is the better long-term investment. There's little point spending money on quality cladding boards and fixing them to a structure that's going to fail in two or three years.
Do I need to treat the timber subframe behind composite cladding? Yes — always use pressure-treated timber for any subframe or post-and-rail work that's going to be outdoors. The composite boards themselves won't rot, but the timber behind them is still exposed to a damp, ventilated environment. Untreated timber in that situation will deteriorate long before the cladding does. For more on what goes behind the boards, our guide on installing composite cladding on brick covers the moisture management principles in detail — many of the same rules apply to timber subframes.
Conclusion
Slatted cladding on a fence is one of the most effective upgrades you can make to a garden boundary — and it's far more achievable than most people assume, whether you're tackling it as a DIY project or briefing a landscaper.
The fundamentals are consistent across both approaches: solid, correctly set posts; a rigid rail framework with adequate support; quality boards with proper expansion gaps; and fixings that won't rust or fail. Get those right and the aesthetic result looks after itself.
Composite is the smart choice for low-maintenance longevity; cedar and larch for natural warmth and character. Both can produce a fence that looks genuinely considered rather than just functional — which is exactly what a well-designed garden boundary should be.
If you're ready to start specifying materials, browse the full composite slatted cladding collection or the slatted timber fencing range — and if you've not yet read the full installation guide, it's worth a look before you start ordering.
